

Deploying a Python Web App with on Kubernetes and Persistent NFS Storage
You’ll learn how to :
- Build a simple Flask web app that Displays an image on a web page and allows users to upload and replace the image
- Containerizing it using Docker
- Pushing the image to a Docker hub registry
- Deploying it in Kubernetes - Create Kubernetes secrets, deployments, service, init container
- Setting up persistent volumes with an NFS volume using static PVs/PVCs

Folder Structure
Below is a typical folder structure for this project.
This structure separates the application logic, HTML templates, and static assets, making it easy to maintain and deploy.
my_app/
├── app.py # Flask application code
├── Dockerfile # Dockerfile for containerization
├── requirements.txt # (Optional) Python dependencies
├── templates/
│ └── index.html # HTML template for the web app
└── static/
├── uploads/ # Directory to store uploaded images (persistent)
└── images/
└── logo.png # logo used in the header
1. Setting Up Your Development Environment
Installing Python and Flask
Before starting, ensure you have Python 3 installed. You can install it using:
sudo apt update && sudo apt install python3 python3-pip -y # Ubuntu/Debian
brew install python3 #MacOS
For Windows, download and install Python from python.org.
Next, install Flask:
pip3 install flask
2. Building the Flask App
Flask is a lightweight and flexible Python web framework used for building web applications quickly. It is minimalist yet powerful.
How It Works:
The app initially displays
static/uploads/current.jpg.Users can upload an image via a form.
The uploaded image replaces the old one.
Lets add the code to the app.py for the application & the index.html for the web-interface
app.py
from flask import Flask, render_template, request, redirect, url_for
import os

app = Flask(__name__)
UPLOAD_FOLDER = 'static/uploads/'
app.config['UPLOAD_FOLDER'] = UPLOAD_FOLDER

# Ensure the upload folder exists
os.makedirs(UPLOAD_FOLDER, exist_ok=True)

# Default image
DEFAULT_IMAGE = 'default.jpg'
image_path = os.path.join(UPLOAD_FOLDER, DEFAULT_IMAGE).replace("\", "/")

@app.route("/", methods=["GET", "POST"])
def index():
if request.method == "POST":
if "file" not in request.files:
return redirect(request.url)

file = request.files["file"]
if file.filename == "":
return redirect(request.url)

if file:
filepath = os.path.join(app.config['UPLOAD_FOLDER'], "current.jpg").replace("\", "/")
file.save(filepath)

return render_template("index.html", image_url="static/uploads/current.jpg")

#if __name__ == "__main__":
# app.run(debug=True)

if __name__ == "__main__":
app.run(host="0.0.0.0", port=5000, debug=True)
- templates/index.html
<!DOCTYPE html>
<html lang="en">
<head>
  <meta charset="UTF-8">
  <meta name="viewport" content="width=device-width, initial-scale=1.0">
  <title>Image Upload</title>
  <style>
    /* Set the background to light blue */
    body {
      background-color: lightblue;
      margin: 0;
      font-family: Arial, sans-serif;
    }
    /* Header for the Kubernetes logo at the top left */
    header {
      position: fixed;
      top: 0;
      left: 0;
      padding: 10px;
      z-index: 1000; /* Ensure header stays on top */
    }
    header img {
      height: 70px; /* Adjust size as needed */
    }
    /* Container for main content with padding to avoid header overlap */
    .content {
      padding-top: 50px;
    }
    /* Style for the green upload button */
    .upload-button {
      background-color: green;
      border: none;
      color: rgb(213, 213, 213);
      padding: 10px 20px;
      text-align: center;
      text-decoration: none;
      display: inline-block;
      font-size: 16px;
      margin: 4px 2px;
      cursor: pointer;
      border-radius: 4px;
    }
    /* Style to center and enlarge the image */
    .centered-image {
      display: block;
      margin: 20px auto;
      max-width: 80%;
      height: auto;
    }
    /* Center-align headings and form */
    .center {
      text-align: center;
    }
  </style>
</head>
<body>
  <header>
    <!-- Update the src to point to your logo file -->
    <img src="static/images/logo.png" alt="Logo">
  </header>
  <div class="content">
    <h2 class="center">Upload an Image</h2>
    <form method="POST" enctype="multipart/form-data" class="center">
      <input type="file" name="file">
      <button type="submit" class="upload-button">Upload</button>
    </form>
    <h3 class="center">Current Image:</h3>
    <img src="{{ image_url }}" alt="Uploaded Image" class="centered-image">
  </div>
</body>
</html>
Running the App on your local system
python app.py
Visit http://127.0.0.1:5000/ in your browser to access the app.
3. Containerizing with Docker
To install docker on your system, you can follow this official docker installation guide
Lets create the docker file
- Dockerfile
# Use the official Python image as a base
FROM python:3.9

# Set the working directory
WORKDIR /app

# Copy all files to the container
COPY . .

# Install dependencies
RUN pip install flask

# Expose the port Flask runs on
EXPOSE 5000

# Run the application
CMD ["python", "app.py"]
Building & Running the Docker Container
- Build the Docker Image:
docker build -t my_app .
- Run the Container in Detached Mode:
docker run -d -p 5000:5000 -v $(pwd)/static/uploads:/app/static/uploads --name mywebapp my_app
Explanation of Flags:
-d→ Runs the container in detached mode (background).-p 5000:5000→ Maps port 5000 of the container to port 5000 on the node.-v $(pwd)/static/uploads:/app/static/uploads→ Mounts the upload directory so files persist.--name mywebapp→ Assigns the container a custom name (mywebapp).my_app→ The name of your Docker image.
Access the Application:
Open your browser at http://<Docker_host_IP>:5000
4. Pushing the Image to a Registry
Now that we have tested the application on a docker container, lets push the docker image that we build to a registry
I am using docker hub. But you can use any other cloud based registry such as GitHub Container Registry or a self hosted one such as docker registry or harbor
If your docker hub repository is a private one, then you will need to authenticate.
Use docker login command on your docker host and follow the instructions on the screen
- Login to registry
root@docker:~# docker login

USING WEB-BASED LOGIN

i Info → To sign in with credentials on the command line, use 'docker login -u <username>'


Your one-time device confirmation code is: XXXX-YYYY
Press ENTER to open your browser or submit your device code here: https://login.docker.com/activate

Waiting for authentication in the browser…
- Tag the Image
docker tag my_app <docker_hub-repo_name>/python_picture_webapp:v1
- Push the Image
docker push <docker_hub-repo_name>/python_picture_webapp:v1
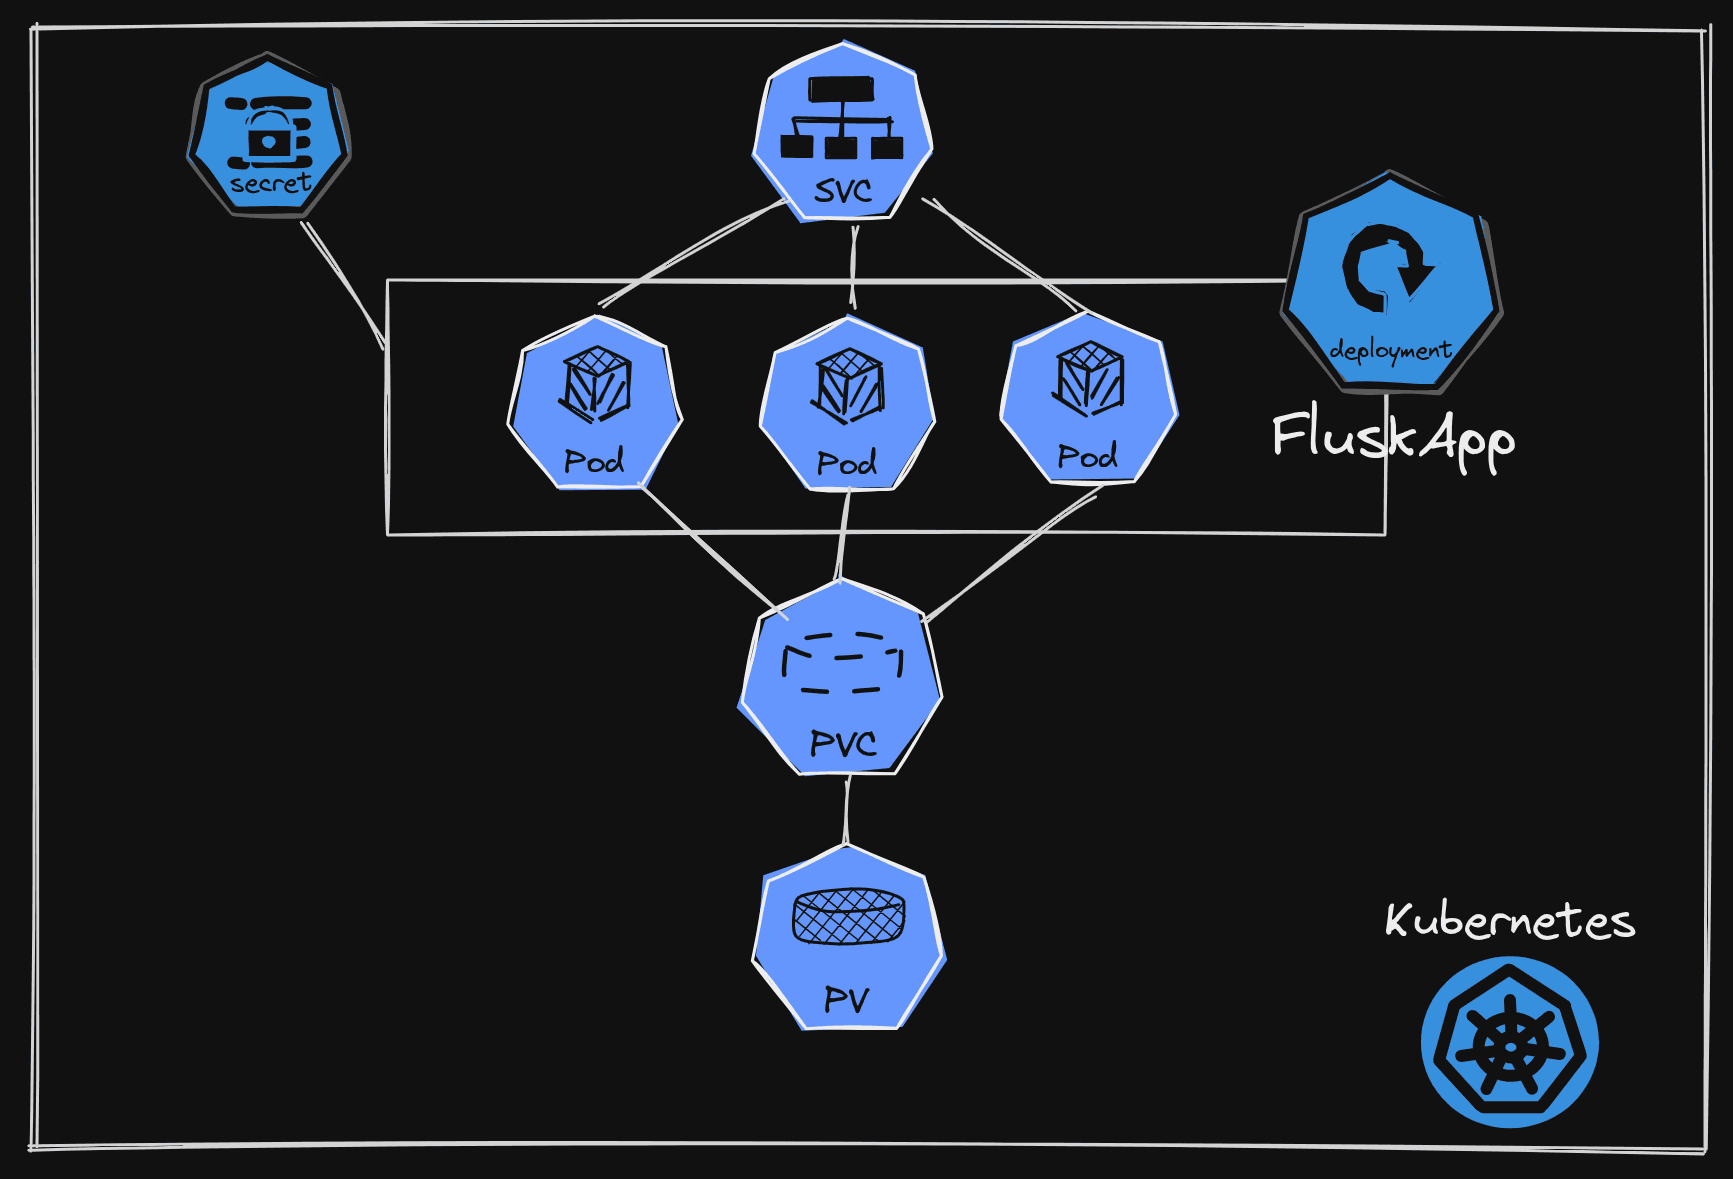
5. Deploying in Kubernetes
- Kubernetes manifests used in this project
apps/python_picture_webapp/
├── deployment.yaml        # Deployment resource for the Flask app
├── service.yaml           # Service to expose the app
├── persistent-volume.yaml # NFS PersistentVolume (PV)
├── persistent-claim.yaml  # PersistentVolumeClaim (PVC)
├── secret.yaml            # Secret for pulling private images from dockerhub
└── namespace.yaml         # Namespace definition (if organizing workloads)
- Create a Secret for accessing the private docker hub
Lets use kubectl to create the secret
kubectl create secret docker-registry mycred \
  --docker-server=https://index.docker.io/v1/ \
  --docker-username=<your-username> \
  --docker-password=<your-password> \
  --docker-email=<your-email>
This command creates a Secret of type kubernetes.io/dockerconfigjson
Retrieve the .data.dockerconfigjson field from that new Secret and decode the data:
kubectl get secret mycred -o jsonpath="{.data.\.dockerconfigjson}" | base64 --decode

#Output :

{"auths":{"https://index.docker.io/v1/":{"username":"test-user","password":"your-pass","email":"test@acme.example","auth":"TlJFeG1pY25mMw=="}}}
Caution:
The
authvalue there is base64 encoded; it is obscured but not secret. Anyone who can read that Secret can learn the registry access bearer token.
- Create static persistent volume & claim using a NFS backed storage
On the NFS share, you must have rw,sync permissions
root@ovm-nfs:~# exportfs -v
/export/nfs_python_pictures_app
                192.168.1.0/24(sync,wdelay,hide,no_subtree_check,rw,secure,no_root_squash,no_all_squash)
- pv_python-pictures-app.yaml
apiVersion: v1
kind: PersistentVolume
metadata:
  name: nfs-python-pictures-app
  labels:
    type: nfs
    app: python-picture-webapp
spec:
  capacity:
    storage: 1Gi
  accessModes:
    - ReadWriteMany
  persistentVolumeReclaimPolicy: Retain
  nfs:
    server: 192.168.1.110         # Replace with your NFS server hostname/IP
    path: "/export/nfs_python_pictures_app"        # Replace with your exported directory
- pvc_python-pictures-app.yaml
apiVersion: v1
kind: PersistentVolumeClaim
metadata:
  name: pvc-python-pictures-app
spec:
  accessModes:
    - ReadWriteMany
  resources:
    requests:
      storage: 1Gi
- Apply the persistent volume & claim manifests
root@controller01:~# kubectl apply -f pv_python_picture_webapp.yaml
persistentvolume/pv-nfs-python-pictures-app created
root@controller01:~# kubectl apply -f pvc_python_picture_webapp.yaml
persistentvolumeclaim/pvc-python-pictures-app created
root@controller01:~# kubectl get pv,pvc
NAME                                       CAPACITY   ACCESS MODES   RECLAIM POLICY   STATUS   CLAIM                             STORAGECLASS   VOLUMEATTRIBUTESCLASS   REASON   AGE
persistentvolume/nfs-python-pictures-app   1Gi        RWX            Retain           Bound    default/pvc-python-pictures-app                  <unset>                          9d

NAME                                            STATUS   VOLUME                    CAPACITY   ACCESS MODES   STORAGECLASS   VOLUMEATTRIBUTESCLASS   AGE
persistentvolumeclaim/pvc-python-pictures-app   Bound    nfs-python-pictures-app   1Gi        RWX                           <unset>                 9d
Lets now put together the deployment.yaml
- deployment.yaml
apiVersion: apps/v1
kind: Deployment
metadata:
  name: python-picture-webapp-v1-1
spec:
  replicas: 4  # Number of pods
  selector:
    matchLabels:
      app: python-picture-webapp
  template:
    metadata:
      labels:
        app: python-picture-webapp
        color: blue
    spec:
      imagePullSecrets:
      - name: mycred   # use the secret created in the begining
      initContainers:  # this init container is used to copy the logo.png to the nfs share
      - name: init-static-images
        image: sumitsur74/python_picture_webapp:v1.1   # your image from your registry
        command: ['sh', '-c', 'cp -r /app/static/images/* /mnt/static/images/']
        volumeMounts:
        - name: nfs-python-pictures-app
          mountPath: /mnt/static
      containers:
      - name: python-picture-webapp
        image: sumitsur74/python_picture_webapp:v1.1  # your image from your registry
        ports:
        - containerPort: 5000
        volumeMounts:
        - name: nfs-python-pictures-app
          mountPath: /app/static  # Mount the static folder
      volumes:
      - name: nfs-python-pictures-app
        persistentVolumeClaim:
          claimName: pvc-python-pictures-app
When deploying the app, you might encountered an issue where the logo.png kept under /static/images directory were not copied to the Persistent Volume (PV). This behavior occurs because, in Kubernetes, mounting a volume to a directory within a container overrides the existing contents of that directory. Consequently, any files baked into the Docker image at that path become inaccessible once the volume is mounted.
- Use an Init Container to Populate the PV:
An Init Container can be employed to copy the necessary files from the Docker image to the Persistent Volume before the main application container starts. This Init Container copies the contents from /app/static/images/ (within the Docker image) to /mnt/static/images/, which is the mounted Persistent Volume.
The main application container then mounts the same Persistent Volume at /app/static, ensuring that the /app/static/images/ directory contains the necessary files from the PV
initContainers:  # this init container is used to copy the logo.png to the nfs share
      - name: init-static-images
        image: sumitsur74/python_picture_webapp:v1.1   # your image from your registry
        command: ['sh', '-c', 'cp -r /app/static/images/* /mnt/static/images/']
        volumeMounts:
        - name: nfs-python-pictures-app
          mountPath: /mnt/static
Lets prepare the service.yaml for the networking of the application
If a client makes a request on the node at http://<NodeIP>:32000, it will:
🡲Hit port 32000 on the node.
🡲Be forwarded to the service on port 80.
🡲 The service will route the request to a pod on port 5000.
- service.yaml
apiVersion: v1
kind: Service
metadata:
  name: python-picture-service
spec:
  selector:
    app: python-picture-webapp
    color: blue
  ports:
    - protocol: TCP
      port: 80
      targetPort: 5000
      nodePort: 32000
  type: NodePort
- Apply the deployment & service
root@controller01:~/git_codebase/k8s_homelab/apps/python_picture_webapp# kubectl apply -f deployment-v1.1-persistent_init_container.yaml
deployment.apps/python-picture-webapp-v1-1 created

root@controller01:~/git_codebase/k8s_homelab/apps/python_picture_webapp# kubectl apply -f service.yaml
service/python-picture-service created
- Verify the pods & service
root@controller01:~# kubectl get pods
NAME                                         READY   STATUS    RESTARTS   AGE
python-picture-webapp-v1-1-8f94986fc-47bh9   1/1     Running   0          2m28s
python-picture-webapp-v1-1-8f94986fc-6chdm   1/1     Running   0          2m28s
python-picture-webapp-v1-1-8f94986fc-88w5q   1/1     Running   0          2m28s
python-picture-webapp-v1-1-8f94986fc-h9lch   1/1     Running   0          2m28s
root@controller01:~# kubectl get service -o wide
NAME                     TYPE        CLUSTER-IP    EXTERNAL-IP   PORT(S)        AGE   SELECTOR
kubernetes               ClusterIP   10.96.0.1     <none>        443/TCP        76d   <none>
python-picture-service   NodePort    10.96.5.206   <none>        80:32000/TCP   17d   app=python-picture-webapp,color=blue
- Access the application at
http://<NodeIP>:32000


